
How to use Ekahau Sidekick for a WiFi site survey
How to use Ekahau Sidekick for a WiFi site survey
A floor plan-to-report workflow for collecting clean Ekahau Sidekick survey data and turning it into recommendations, validation decisions, or a PacketScout review handoff.
A practical Ekahau Sidekick workflow for turning a floor plan, a site walk, and RF measurements into report-ready WiFi survey data.
This guide is for IT teams, WiFi admins, and PacketScout rental customers who need more than a colorful heatmap. It shows how to use Ekahau Sidekick or Sidekick 2 as part of a field workflow: define the objective, prepare the floor plan, choose the right collection mode, walk accurately, QA the data before leaving, and turn the results into a report or action plan.
Software screens, supported platforms, firmware behavior, charging behavior, and menus can change. Verify exact device and app steps against current Ekahau documentation before field work. The workflow below focuses on the decisions that make the data trustworthy.
Workflow at a glance
Use the Sidekick workflow as a chain, not a single walk-and-export step:
- Scope the decision. Decide what the survey must prove.
- Prepare the map. Clean, scale, label, and split floor plans before the visit.
- Choose the mode. Pick the collection method that fits the building and objective.
- Walk the site. Keep the path aligned with real walls, aisles, and user areas.
- QA before leaving. Check coverage gaps, path jumps, notes, and problem zones while you can still re-walk.
- Analyze the evidence. Review coverage, SNR, noise, channel behavior, AP placement, and client context.
- Report the action. Translate data into AP changes, configuration changes, validation results, or next-step design work.

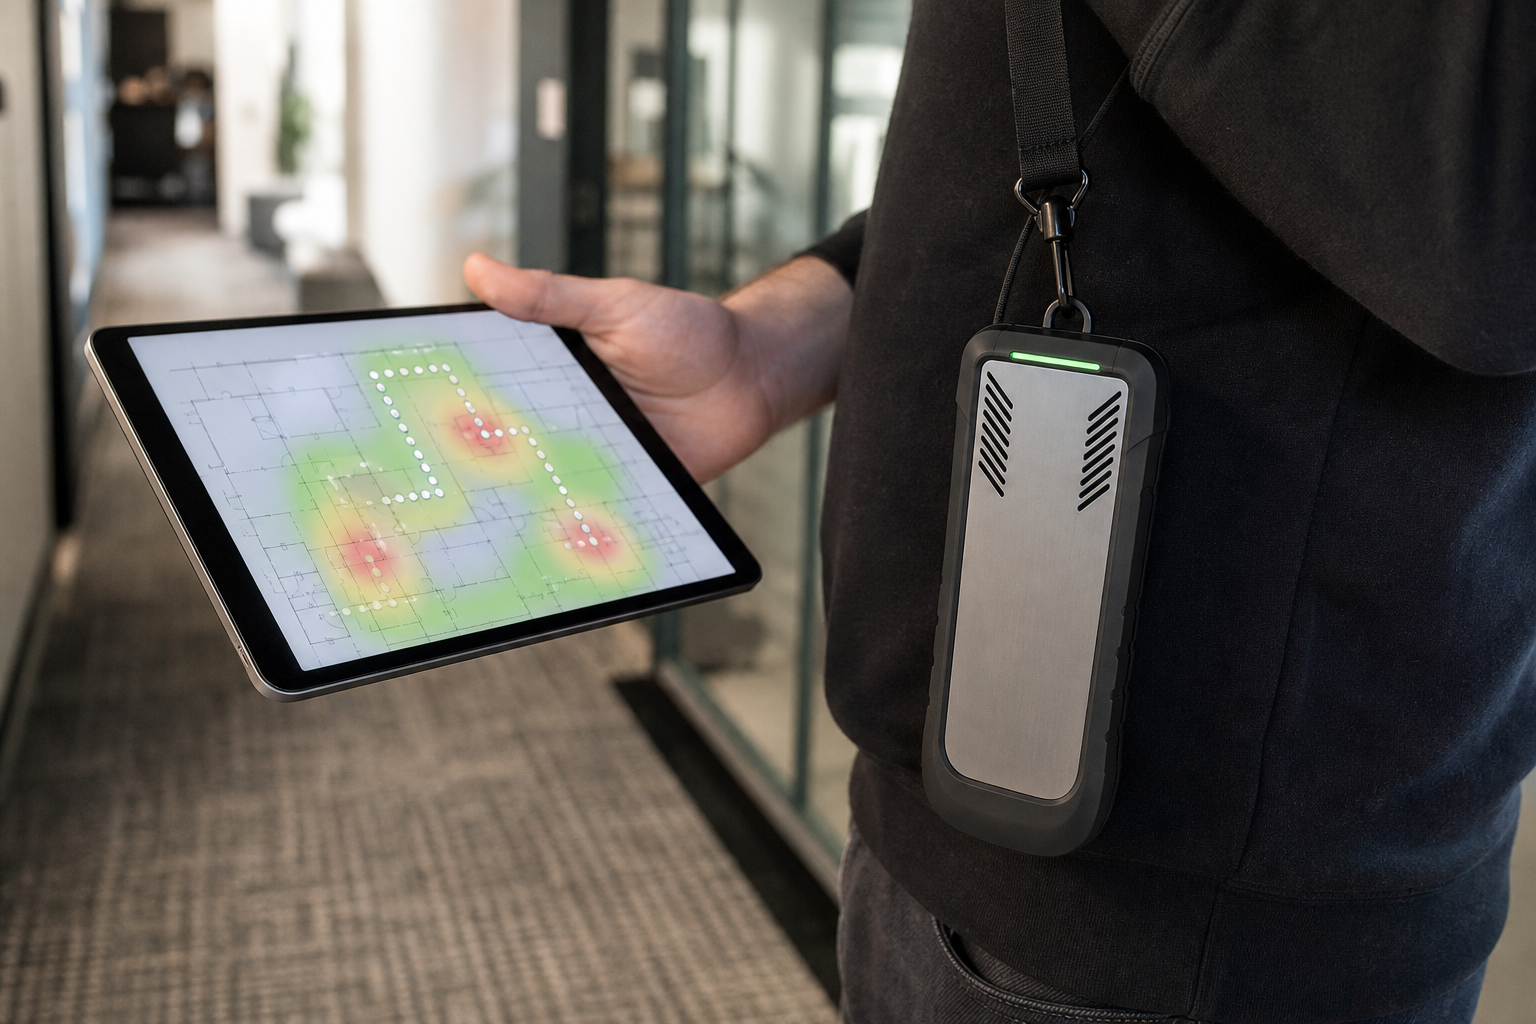
What the Sidekick is doing
Ekahau Sidekick should be treated as a measurement instrument, not as a magic answer button. A good survey uses the device to collect RF evidence that answers a specific question:
- Do users have usable coverage in the areas that matter?
- Are signal strength, SNR, noise, and channel behavior consistent with the requirement?
- Do AP locations support real movement through offices, warehouses, aisles, docks, and meeting spaces?
- Are scanners, phones, tablets, laptops, and guest devices behaving differently?
- Do AP moves, added APs, channel changes, or power changes need validation?
The Sidekick improves measurement consistency, but the survey is only as good as the objective, floor plan, walking accuracy, notes, and analysis.
Step 1: Define the survey objective
Before charging gear or importing maps, decide what the survey must prove. A vague objective like “make a WiFi heatmap” often leads to vague recommendations. Use an objective-to-evidence plan so the field walk collects the right proof.
| Survey objective | Evidence the Sidekick workflow should capture | Deeper reference |
|---|---|---|
| Coverage validation | Walk all user areas, confirm map scale, inspect coverage and SNR by band, and record missed rooms or aisles. | WiFi heatmap services and how to read a WiFi heatmap report |
| Scanner or mobile-computer complaints | Walk aisles, docks, staging lanes, and exact trouble zones; note scanner model, mounting height, obstructions, and roaming boundaries. | Barcode scanners dropping WiFi and warehouse scanner survey guide |
| Voice, Zoom, Teams, or roaming instability | Capture movement paths, meeting rooms, transition areas, SNR/noise conditions, and where calls fail even when RSSI looks acceptable. | Office WiFi survey for Zoom and Teams |
| AP placement or design validation | Confirm AP locations, attenuation boundaries, coverage overlap, capacity assumptions, and places where predictive design did not match the building. | Wireless network design services and common Ekahau survey mistakes |
| Rental review handoff | Collect clean project files, floor plans, notes, photos, skipped areas, client/device context, and the business decision being made. | WiFi survey equipment rental vs managed service |
Avoid calling pre-install work “validation” unless there is something specific to validate. Better wording is pre-install design review, AP-on-a-stick proof of concept, or post-change validation.
Step 2: Run the 24 hour preflight checklist
Run this checklist before the site visit, not in the parking lot:
- Sidekick or Sidekick 2 is present, charged, and physically inspected.
- Required cables, adapters, charger, case, and any rental-kit items are present.
- Survey device, Ekahau software/app, account access, and project files are ready.
- Floor plans are available in usable digital form.
- Scope, floors, SSIDs, bands, client types, and problem areas are documented.
- Site contact, access windows, safety requirements, and locked-room constraints are known.
- Backup plan exists for project files and photos/notes.
- The team has decided which survey mode is likely to be used first.
If you are renting equipment, do this immediately after receiving the kit. If something is missing, there is still time to fix it. For a kit-specific version, use the Ekahau Sidekick pre survey checklist.
Step 3: Prepare the floor plan
The floor plan must be usable before you walk. A bad map can make good RF data look misleading.
Practical map preparation:
- use a clean digital plan whenever possible;
- verify scale with a known measurement such as a corridor, room width, rack row, or building dimension;
- split very large spaces into manageable floors or zones;
- label floors, warehouses, aisles, docks, conference rooms, and office areas clearly;
- mark out-of-scope, locked, hazardous, or inaccessible areas;
- remove visual clutter that makes walking alignment difficult;
- keep a copy of the source plan so changes can be traced.
For a deeper map-prep workflow, use Prepare Floor Plans for Ekahau Survey Work.
Step 4: Choose the survey mode
Different projects need different collection behavior. Keep the decision simple in the field, then use the dedicated mode guide for deeper detail.
| Mode | Use it when | Watch out for |
|---|---|---|
| Just Go | You need quick manual collection in a simple area. | Path accuracy still matters; do not click through walls. |
| Auto Pilot | The walk is predictable and the map is clean enough for guided collection. | Validate the route before trusting a long pass. |
| Continuous | You are walking a steady path through offices, aisles, or corridors. | Walking too fast can make location accuracy questionable. |
| Stop and Go | You need controlled measurements in specific rooms, aisles, or problem zones. | It is slower, but useful when precision matters. |
| GPS | Outdoor or campus-style work where GPS is appropriate. | Indoor GPS assumptions can be wrong. |
| Inspect | You need to look at current RF conditions without committing to a full walk. | It is not a substitute for a complete survey when a report is required. |
For the full mode breakdown, see Ekahau Survey modes explained.
Step 5: Arrival and connection sanity check
When you arrive, do a short sanity pass before collecting production data:
- confirm the floor plan matches the physical area;
- verify scale with a real measurement if possible;
- mark locked rooms, safety zones, or areas that cannot be entered;
- confirm which SSIDs, bands, client types, and APs are in scope;
- power on the Sidekick or Sidekick 2;
- connect it to the survey device using the documented method for that model;
- open the correct Ekahau app/software and project;
- confirm the device is detected;
- confirm the intended map/floor is active;
- collect a short test path;
- review whether the path, map scale, and data capture look believable.
If the device is not detected, do not keep walking. Stop and check model, cable, power, battery, app compatibility, permissions, firmware/software notes, and current Ekahau documentation.
Step 6: Walk the site like the map matters
The most common survey mistakes are not complicated. They are field-discipline problems.
Do:
- walk at a steady, realistic pace;
- mark turns, room entries, and hallway intersections accurately;
- cover user areas instead of only convenient open paths;
- walk warehouse aisles, docks, staging lanes, freezer boundaries, and scanner trouble zones when in scope;
- slow down in high-density rooms and complaint areas;
- keep the path aligned with walls, aisles, and walkable spaces;
- document areas that could not be entered.
Avoid:
- clicking through walls;
- jumping across rooms, aisles, or shelves;
- skipping locked or inconvenient spaces without noting them;
- walking only the perimeter of a warehouse;
- assuming a laptop path proves scanner behavior;
- collecting data so fast that the path no longer represents your real location.
For a broader collection-quality reference, see WiFi site survey data collection best practices.
Step 7: Capture notes that explain the heatmap
A heatmap does not remember what you saw. Notes and photos help convert the survey into a usable report.
Capture field context such as:
- visible AP locations and mounting height;
- APs believed to be above ceilings, inside enclosures, or blocked by obstructions;
- metal racks, glass, concrete, machinery, freezer/cold storage boundaries, and dock doors;
- high-density meeting rooms, training rooms, or device-staging areas;
- scanner model, phone model, tablet model, or laptop class tied to a known symptom;
- safety or access limitations;
- cabling and mounting constraints;
- user-reported symptoms and times of day.
For PacketScout projects, these notes matter because the final recommendation may need to be understood by IT, facilities, operations, and the people approving the work.
Step 8: QA the data before leaving
Before packing up, check the data while you can still re-walk gaps:
- every area in scope is represented;
- the path aligns with the floor plan;
- critical rooms, aisles, docks, and transition zones are included;
- map scale looks believable;
- notes/photos are attached where useful;
- problem zones have enough evidence to analyze;
- each floor or area is saved correctly;
- the project file is backed up or synced according to the approved workflow.
If an area is missing, collect it now. A repeat visit is more expensive than a ten-minute correction.
Step 9: Turn Sidekick data into a report/action plan
After collection, review more than coverage colors. Sidekick data becomes useful when it is tied back to the objective from Step 1.
A report-ready review should connect:
- coverage and SNR conditions to the areas where people and devices actually work;
- noise, interference, and channel behavior to symptoms or design constraints;
- AP locations and antenna assumptions to the real building layout;
- capacity and roaming concerns to client types and movement paths;
- problem-zone notes to specific remediation choices;
- recommended AP moves, added APs, channel/power changes, cabling work, or validation retests to the evidence collected onsite.
For report structure, use what a professional WiFi site survey report should include. For RF interpretation, use WiFi signal strength, SNR, noise, and channel overlap explained.
Troubleshooting quick box
| Symptom in the field | What to check before continuing |
|---|---|
| Sidekick is not detected | Cable/connection method, power, app permissions, software version, firmware notes, and model compatibility. |
| The path does not line up with the map | Floor selection, map scale, starting point, rotation, and whether the drawing matches the actual space. |
| Heatmap looks too perfect | Confirm you walked user areas, not only open corridors or perimeter paths. |
| Data looks thin in a complaint area | Re-walk the area, slow down, and add notes/photos tied to the symptom. |
| Results show RSSI but the experience is still bad | Inspect SNR, noise, channel behavior, roaming boundaries, capacity assumptions, and device class. |
| Warehouse scanner issue is not reproduced | Walk the actual scanner path and note racks, docks, forklift lanes, device model, and timing of failures. |
Field data quality checklist
Good Sidekick data means more than lots of points on a map. Use this checklist before treating the survey as ready for analysis:
| Check | Pass condition | If weak |
|---|---|---|
| Objective | The project states what decision the survey must support. | Rewrite the objective before interpreting results. |
| Map scale | Known measurements match the imported plan. | Rescale or replace the floor plan. |
| Path accuracy | The walk follows real walls, aisles, rooms, and transitions. | Re-walk bad segments before leaving. |
| Scope coverage | All in-scope floors, aisles, docks, offices, and problem zones are represented. | Collect missing areas now. |
| Notes and photos | APs, obstructions, skipped areas, and symptoms are documented. | Add context before exporting a report. |
| Bands and client context | The survey notes relevant bands, SSIDs, device classes, and business-critical apps. | Clarify scope with the site contact or IT owner. |
| Analysis readiness | Coverage, SNR, noise, channel behavior, and AP placement can be reviewed against the objective. | Do not treat the heatmap as the whole answer. |
| Handoff | Project file, floor plans, notes, photos, skipped areas, and site context are backed up. | Package the handoff before closing the job. |
If any row is weak, fix it before final analysis. A careful re-walk of a small area can be more useful than a complete but questionable dataset.
Rental vs PacketScout service support
WiFi survey equipment rental can make sense when your team can define the objective, prepare the floor plans, walk accurately, and collect clean data. PacketScout review or managed Ekahau survey service is a better fit when the project needs planning, onsite execution, report interpretation, AP placement recommendations, or post-change validation.
Many projects use a hybrid path: rent the equipment for collection, then ask PacketScout to review the project file and help interpret the results. That keeps rental as a practical option without pretending every site can be solved by screenshots alone.
If your team collects data with rented equipment and wants PacketScout to review it, send:
- the project file or export;
- the floor plans used for the walk;
- photos/notes from APs, obstructions, and trouble zones;
- known scanner, phone, laptop, or client models;
- SSIDs and bands in scope;
- skipped or inaccessible areas;
- the business symptom and desired decision.
Related options: rent survey equipment, Ekahau WiFi survey services, and WiFi site survey services.
FAQ
Can Sidekick be used with mobile devices?
Ekahau describes Sidekick workflows that can involve mobile or laptop workflows depending on the device, model, and software version. Verify current app and compatibility details against current Ekahau documentation before a field visit.
Does Sidekick 2 support 6 GHz?
Current Sidekick 2 materials describe 2.4, 5, and 6 GHz validation and measurement support. Older Sidekick material should not be used for Sidekick 2-specific hardware decisions.
Is this an official Ekahau tutorial?
No. This is a PacketScout field workflow guide based on practical survey planning and reviewed public materials. Use official Ekahau documentation for exact current product steps, menus, firmware behavior, and compatibility details.
What should I do after collecting Sidekick survey data?
Review the data against the objective, inspect coverage/SNR/noise/channel behavior, tie findings to notes from the site, and turn the results into recommendations or validation decisions. PacketScout can help with report review and next-step planning.
When is rental enough, and when should PacketScout handle the survey?
Rental can work when your team can prepare the floor plan, walk the site accurately, and interpret the results. Use PacketScout service or review when the site is complex, the symptoms affect operations, the data needs executive-ready recommendations, or the result will drive AP placement and cabling decisions.
Want PacketScout to review the site?
Send the floor plan, square footage, AP model, critical devices, project file if available, and the problem you are trying to solve.